
TL;DR:
- Composting transforms household and garden waste into nutrient-rich soil and reduces waste.
- Beginners should balance greens and browns, keep the pile moist, and turn it regularly for best results.
Composting is the managed biological decomposition of organic waste that turns household and garden scraps into nutrient-rich soil amendment. Every banana peel, cardboard box, and pile of dry leaves you throw away is a missed opportunity to feed your garden for free. This beginner composting guide covers everything you need to start: the right materials, the best bin types, how to maintain a healthy pile, and how to fix problems before they derail your efforts. Whether you have a large garden or a small balcony, home composting is simpler than most people expect.
What can you compost at home?
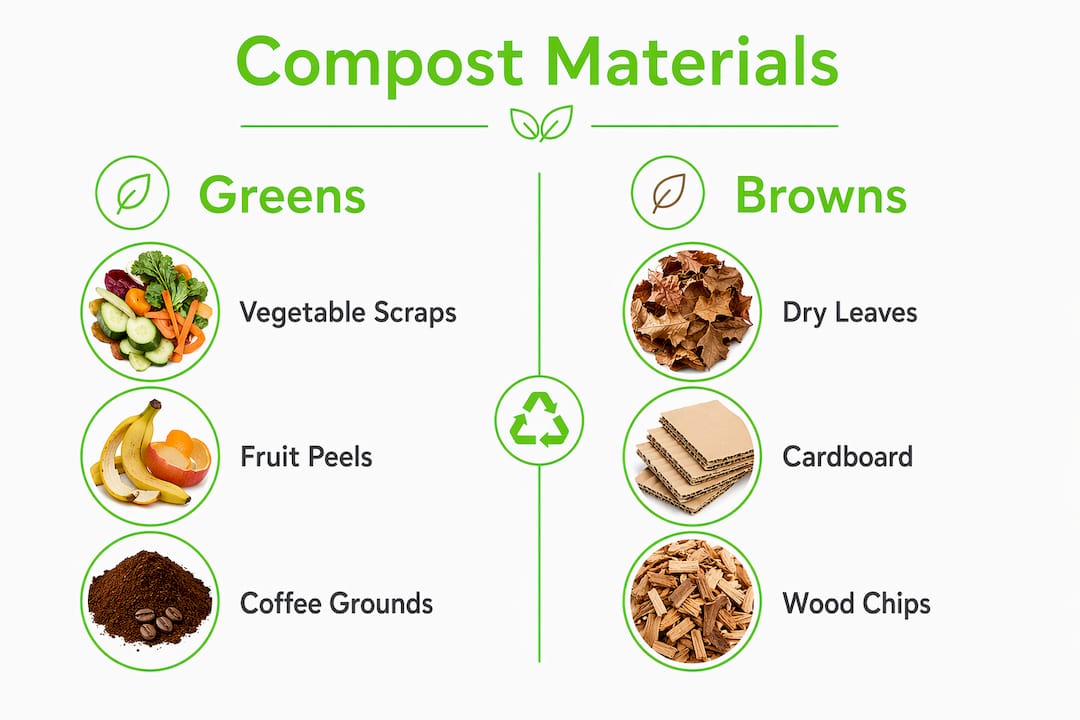
Composting works by balancing two types of material: greens and browns. Greens are nitrogen-rich and include fresh kitchen scraps, grass clippings, coffee grounds, and fruit peelings. Browns are carbon-rich and include dry leaves, cardboard, newspaper, straw, and woody trimmings. The ideal brown-to-green ratio is 2–3 parts browns to every 1 part greens by volume. Getting this balance right is the single most important step for a healthy, odour-free pile.
Greens to add:
- Vegetable and fruit scraps
- Coffee grounds and tea bags
- Fresh grass clippings
- Plant trimmings and weeds (without seeds)
- Eggshells
Browns to add:
- Dry autumn leaves
- Torn cardboard and egg boxes
- Newspaper and brown paper bags
- Straw and wood chips
- Woody prunings chopped into small pieces
Never compost meat, fish, dairy products, or cooking oils. These materials attract rats and foxes, create foul odours, and slow decomposition. Cooked food and pet waste carry pathogens that a home compost pile rarely gets hot enough to destroy safely. Keeping these out is one of the most important composting mistakes to avoid.
Pro Tip: Cover every fresh kitchen scrap you add with a layer of dry browns. This one habit prevents most odour and pest problems beginners face.
How do you choose and set up your compost bin?
Location matters more than most beginners realise. Position your bin in a semi-shaded spot on flat, well-drained ground. Avoid placing it directly against a fence or house wall. Good drainage prevents waterlogging, and partial shade stops the pile drying out too fast in summer.
Comparing common bin types
| Bin type | Best for | Pros | Cons |
|---|---|---|---|
| Plastic dalek bin | Gardens of any size | Affordable, retains heat and moisture | Slow to turn, limited airflow |
| Wooden pallet bin | Large gardens | Free to build, excellent airflow | Requires space, open to pests |
| Tumbler bin | Small gardens | Easy to turn, pest-resistant | Expensive, dries out quickly |
| Worm bin (vermicomposting) | Flats and small spaces | Compact, produces rich worm castings | Needs regular feeding and temperature control |
For most beginners, a plastic dalek bin from a local council scheme is the easiest starting point. Many UK councils sell subsidised compost bins for under £10. If you live in a flat, a worm composting bin fits under a kitchen counter and processes food scraps efficiently without outdoor space.
Start your bin with a base layer of twigs or wood chips, roughly 10–15 centimetres deep. This base layer creates airflow from the bottom and prevents the pile from sitting in water. Keep a lid or piece of old carpet over the top to retain moisture and deter pests.
Pro Tip: Keep a small bucket with a lid on your kitchen worktop for collecting scraps. Empty it every two to three days to avoid fruit flies and unpleasant smells indoors.
How do you build and maintain a healthy compost pile?
Think of building your compost pile like making lasagne. Start with a layer of browns, then add a thinner layer of greens, then repeat. This layering method distributes nitrogen and carbon evenly from the start, giving microbes the best conditions to work.
Step-by-step process:
- Lay a 10 cm base of twigs or coarse wood chips for drainage and airflow.
- Add a 10–15 cm layer of browns such as dry leaves or torn cardboard.
- Add a 5–8 cm layer of greens such as vegetable peelings or grass clippings.
- Repeat layers until the bin is full, finishing with a brown layer on top.
- Check moisture weekly using the wrung-out sponge test.
- Turn the pile every two to four weeks to introduce oxygen.
Shredding materials before adding them speeds decomposition by increasing the surface area available to microbes. A bag of whole autumn leaves takes months to break down. The same leaves shredded with a lawnmower can decompose in weeks.
Moisture and aeration
The wrung-out sponge test is the industry standard for checking compost moisture. Grab a handful of compost and squeeze. It should feel damp but release only a few drops of water. Too dry means decomposition has stalled. Too wet means anaerobic bacteria are taking over, which causes the rotten-egg smell beginners dread.
Turning the pile prevents compacting, allows oxygen to circulate, and speeds up decomposition. Turn it by emptying the bin completely, then refilling it layer by layer. This is more effective than simply poking a stick through the top.
How long does composting take?
| Method | Time to finished compost |
|---|---|
| Hot pile (active turning, balanced ratio) | 3–6 months |
| Cold pile (minimal turning, passive) | 12 months or longer |
A well-maintained hot compost pile can reach temperatures of 130°F to 160°F (54°C to 71°C). Those temperatures destroy weed seeds and pathogens, producing safer, richer compost for your garden beds.
Pro Tip: Push a metal rod or old broom handle into the centre of your pile and leave it for a minute. Pull it out and feel the tip. If it is warm, your pile is active. If it is cold, add more greens and a splash of water.
What composting mistakes should beginners avoid?
Most composting problems have simple fixes. The key is catching them early. Monitor your bin regularly, treating it like a houseplant rather than a bin you fill and forget.
Common problems and solutions:
- Bad smell (ammonia or rotten eggs). Too many greens or too much moisture. Add a thick layer of dry browns and turn the pile to introduce air.
- Pile not heating up. Not enough nitrogen. Add fresh grass clippings, coffee grounds, or vegetable scraps and check that the pile is damp enough.
- Pests (rats, foxes). Never add cooked food or meat. Use a bin with a secure lid and a solid base, or place wire mesh beneath an open-bottomed bin.
- Pile drying out. Add water with a watering can and cover with a lid or damp cardboard to retain moisture.
- Slow activity in winter. Microbial decomposition requires temperatures above 10°C to remain active. In cold months, insulate the bin with old carpet or bubble wrap and keep adding materials. The pile will restart in spring.
Covering kitchen scraps with a layer of browns every time you add them is the single habit that prevents most beginner problems. It controls odour, deters pests, and keeps the carbon-to-nitrogen ratio in check without any measuring.
Pro Tip: In winter, move your bin to a sunnier spot to capture more warmth. Even a few extra degrees of ambient heat keeps microbial activity ticking over.
Key takeaways
Composting at home succeeds when you balance browns and greens, maintain damp but not wet conditions, and turn the pile regularly to keep oxygen flowing.
| Point | Details |
|---|---|
| Balance your materials | Aim for 2–3 parts browns to 1 part greens by volume for a healthy, odour-free pile. |
| Choose the right bin | Match your bin type to your space: a plastic dalek for gardens, a worm bin for flats. |
| Check moisture weekly | Use the wrung-out sponge test and adjust with water or dry browns as needed. |
| Turn the pile regularly | Turn every 2–4 weeks to add oxygen and speed decomposition to as little as 3–6 months. |
| Avoid problem materials | Never add meat, dairy, or cooked food to prevent pests and pathogens. |
Why composting is more art than science
I have been composting for years, and the biggest shift in my thinking came when I stopped treating it as a formula and started treating it as a conversation with my garden. NC State Extension puts it well: composting is more art than science, and beginners should feel free to adjust ratios and moisture as they learn what works for their specific conditions.
My first pile smelled terrible. I had added too many grass clippings after a summer mow and not enough dry material to balance them. The fix took ten minutes: a bag of shredded cardboard and a good turn. Within a week, the smell was gone and the pile was warm again. That experience taught me more than any guide could.
The thing most beginners underestimate is how forgiving composting actually is. You do not need perfect ratios or expensive equipment. You need consistency. Check your pile once a week. Add a handful of browns when you add kitchen scraps. Turn it when you remember. The microbes do the rest.
The environmental satisfaction is real too. Knowing that your vegetable peelings are becoming the soil that grows next year’s tomatoes closes a loop that feels genuinely good. If you want to go deeper on reducing food waste through composting and other habits, the rewards compound quickly.
Start small. Start imperfect. Just start.
— Arjit
Grow your garden the natural way with Naturessoulshop
Composting is one part of a larger commitment to clean, sustainable living. At Naturessoulshop, the same philosophy that drives good composting, using clean, natural ingredients and avoiding unnecessary chemicals, runs through every product in the shop.

From organic fruits and vegetables to vegan and gluten-free grocery staples, Naturessoulshop stocks products that align with the values of anyone building a healthier home and garden. The kitchen scraps from clean, organic produce also make better compost: no pesticide residues, no synthetic coatings, just pure organic matter for your pile. Explore the full range at Naturessoulshop and take the next step in your sustainability journey.
FAQ
What is the easiest composting method for beginners?
Cold pile composting is the easiest method. Add greens and browns to a bin, keep it moist, and turn it occasionally. It takes longer than a hot pile but requires minimal effort.
How long does home composting take?
A hot pile with regular turning produces finished compost in 3–6 months. A cold pile with minimal attention takes 12 months or more.
Can I compost in a small flat with no garden?
Yes. A worm bin fits under a kitchen counter and processes food scraps without outdoor space. Vermicomposting produces rich worm castings that work as a concentrated soil feed for houseplants and balcony pots.
Why does my compost smell bad?
A bad smell usually means too many greens or too much moisture. Add dry browns such as cardboard or dry leaves and turn the pile to reintroduce oxygen.
How do I know when my compost is ready to use?
Finished compost looks dark brown, crumbles easily, and smells earthy like forest soil. You should not be able to identify any of the original materials.


