
TL;DR:
- Home composting transforms kitchen and garden waste into nutrient-rich organic fertilizer through aerobic decomposition, reducing landfill contributions. Proper management of green nitrogen-rich materials and brown carbon-rich materials, along with moisture and aeration, ensures efficient composting in as little as two months. Using suitable bins and maintaining correct ratios, moisture, and turning practices helps prevent odours, pests, and slow breakdown.
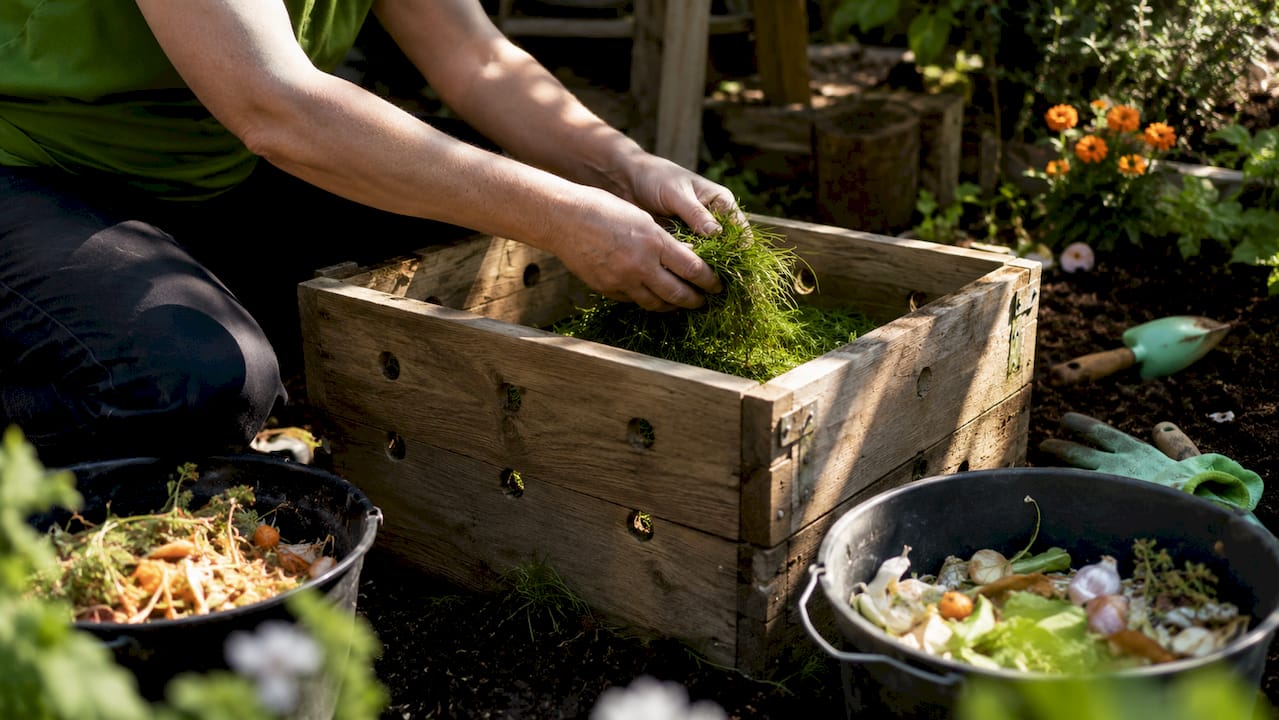
Home composting is the process of turning kitchen and garden waste into nutrient-rich organic fertiliser by managing a balanced mixture of carbon-rich and nitrogen-rich materials alongside air and moisture. Known formally as aerobic decomposition, it is one of the most direct ways an eco-conscious household can cut landfill contributions while producing free, high-quality soil amendment for the garden. The inputs are simple: fruit and vegetable scraps, dry leaves, cardboard, water, and time. The tools are equally accessible, from a basic stationary bin to a purpose-built tumbler or a compact worm farm for indoor use. Get the balance right, and finished compost arrives in as little as two months.
What can you compost at home and what should you avoid?
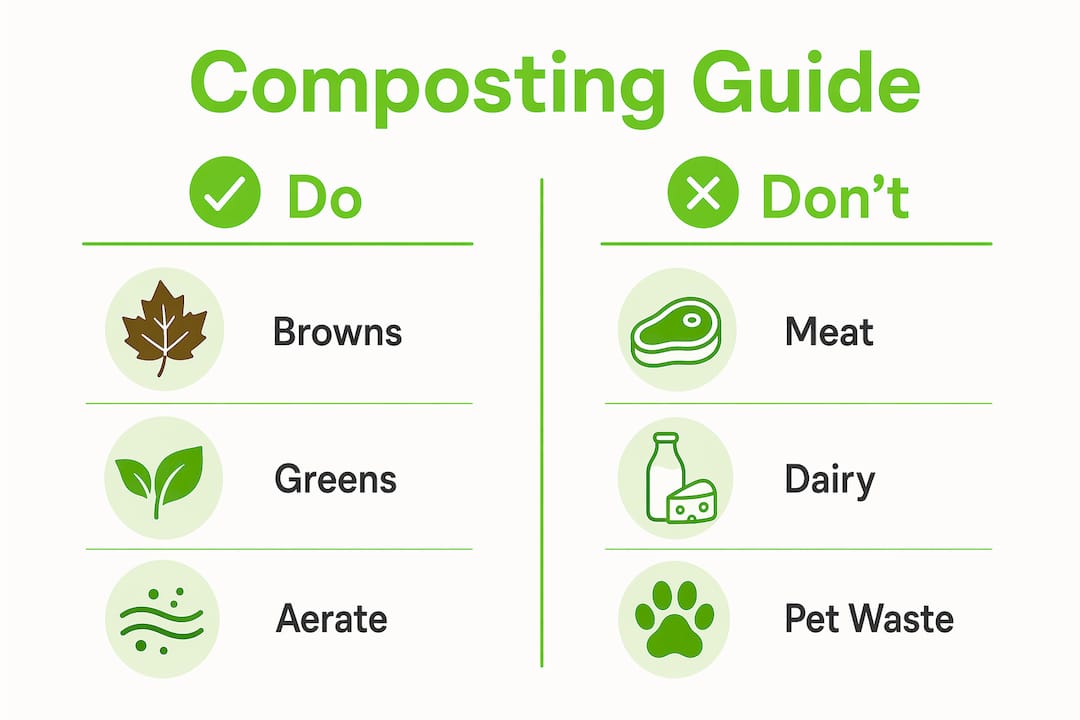
The single most important composting tip for beginners is understanding the difference between “greens” and “browns.” Greens are nitrogen-rich materials that feed the microbes driving decomposition. Browns are carbon-rich materials that provide structure, absorb moisture, and prevent odours. Successful composting depends on managing the balance of these two groups alongside oxygen and moisture to control decomposition speed and smell.
Green materials to add:
- Fruit and vegetable scraps
- Coffee grounds and paper filters
- Fresh grass clippings
- Plant trimmings and fresh leaves
- Tea bags (without staples)
Brown materials to add:
- Dry autumn leaves
- Shredded cardboard and newspaper
- Twigs and woody prunings
- Paper bags and egg cartons
- Straw and hay
Avoid composting dairy products, meat, fish, fats and oils, pet waste, diseased plants, and any plastics or synthetic materials. These items attract rodents, do not break down cleanly, and can introduce pathogens into finished compost. This is not a minor precaution. A single addition of cooked meat can draw rats within days and undermine months of careful work.
The correct starting ratio is at least two to three times more browns than greens by volume. If your pile smells like ammonia or rotting food, it almost certainly has too many greens. Add a thick layer of dry leaves or shredded cardboard and turn the pile to restore balance.
Pro Tip: Chop or tear food scraps into small pieces before adding them to your bin. Smaller surface area means faster microbial activity, and you will notice a real difference in how quickly the pile heats up.
How to set up your home compost bin step-by-step
Choosing the right bin is the first practical decision in any homemade compost guide. The three most common options each suit different households.
Stationary bins are low-cost, low-effort, and ideal for gardens with moderate organic waste. They sit directly on soil, allowing worms and beneficial insects to enter naturally. Compost tumblers are enclosed drums mounted on a frame, which makes turning easier and keeps pests out more reliably. Worm farms (vermicomposting systems) are compact enough for a balcony or kitchen and process food scraps quickly without requiring outdoor space.
Once you have chosen your bin, follow these steps to set it up correctly:
- Choose your location. Place the bin on flat, well-drained ground in a semi-shaded spot. Semi-shade is preferable to full sun because it slows moisture loss, and microbes drive decomposition without needing sunlight to heat the pile. Position it close to your kitchen door and a water source for convenience.
- Lay the base. Start with a 10 to 15 centimetre layer of coarse browns such as twigs, wood chips, or scrunched cardboard. This base layer creates airflow from below and absorbs excess liquid.
- Add your first green layer. Place a 5 to 8 centimetre layer of kitchen scraps or fresh garden trimmings on top of the base.
- Cover with browns. Add another layer of dry leaves or shredded paper on top of the greens. This covering suppresses odours and discourages flies. Cover food scraps with 10 to 20 centimetres of browns every time you add kitchen waste.
- Moisten the pile. Water lightly so the pile feels like a wrung-out sponge. It should be damp throughout but not dripping.
- Secure the lid. Use a bin with a mesh lid and floor to keep rodents out while allowing water and air in. This is particularly important in urban gardens where rats are active.
Pro Tip: Keep a small sealed container on your kitchen bench for collecting daily scraps. Store a bag of dry leaves or shredded cardboard nearby so you always have browns ready to add when you deposit greens.
| Tool or supply | Purpose |
|---|---|
| Garden fork or aerator | Turning and aerating the pile |
| Watering can or spray bottle | Maintaining moisture levels |
| Compost bin with mesh lid | Containing materials and excluding pests |
| Kitchen scrap caddy | Collecting food waste before transferring outdoors |
| Shredded cardboard or dry leaves | Ready supply of browns for covering greens |
How to maintain and troubleshoot your home compost
Actively managed compost breaks down in two to four months. Left unturned and unattended, the same pile can take six to twelve months. The difference is almost entirely down to aeration and moisture management. Turning the pile with a garden fork every one to two weeks moves oxygen into the centre, where microbial activity is highest, and redistributes moisture evenly.
A well-functioning pile will reach temperatures of 54 to 71°C in its core. At these temperatures, weed seeds and most pathogens are destroyed, which is why turning the outer material into the centre periodically matters. You do not need a thermometer to confirm this is happening. If the pile feels warm to the touch and has an earthy smell, decomposition is active.
Moisture is the other critical variable. Maintaining moisture between 40 and 60 percent supports microbial activity and nutrient transport. In practice, this means the pile should feel like a wrung-out sponge. Soggy compost becomes oxygen-poor and smells bad. Dry compost stalls entirely.
| Problem | Likely cause | Fix |
|---|---|---|
| Bad smell (ammonia or rotting) | Too many greens, too wet | Add browns, turn pile to aerate |
| No heat or activity | Too dry, too many browns | Add water and fresh green materials |
| Pests or flies | Food scraps exposed | Cover with 10 cm of browns, check lid seal |
| Slow breakdown | Materials too large | Chop scraps, turn more frequently |
| Slimy texture | Compacted, waterlogged | Add dry browns, fork through to loosen |
Pro Tip: If your compost smells like a farmyard rather than fresh soil, the fix is almost always the same: add a generous layer of shredded cardboard and turn the pile. Browns are your most reliable troubleshooting tool.
Vermicomposting: using worms to compost indoors
Vermicomposting is the practice of using worms to break down organic matter, and it is the best indoor composting technique for households without garden space. The process produces worm castings, a concentrated fertiliser that many gardeners consider superior to standard compost for potted plants and seedlings. If you are exploring indoor composting techniques, a worm bin is the most practical starting point.
The species to use is Eisenia fetida, commonly called red wigglers. Red wigglers require approximately 1,000 worms (roughly half a kilogram) in a suitable bin with aerated bedding. Unlike earthworms, they live and feed near the surface rather than burrowing deep, which makes them ideal for shallow bin systems.
Setting up a worm bin:
- Use a bin roughly 30 centimetres deep with ventilation holes in the lid and sides
- Fill the base with damp bedding: shredded newspaper, coconut coir, or aged cardboard works well
- Add your worms and allow them to settle for 48 hours before feeding
- Feed small amounts of fruit and vegetable scraps, coffee grounds, and crushed eggshells
- Avoid citrus, onion, garlic, spicy foods, and anything oily or cooked
Pro Tip: Fruit flies are the most common worm bin complaint. Bury food scraps under the bedding rather than leaving them on the surface, and the problem largely disappears. If flies persist, add a layer of damp newspaper directly over the food.
Harvest worm castings every two to three months by moving finished compost to one side of the bin and adding fresh bedding and food to the other. Worms migrate toward the food, leaving the finished castings easy to collect. Mix castings into potting soil at a ratio of roughly one part castings to four parts soil for noticeably stronger plant growth.
Key takeaways
Successful home composting requires a consistent ratio of browns to greens, adequate moisture, regular aeration, and the right bin for your space.
| Point | Details |
|---|---|
| Browns to greens ratio | Use at least two to three times more browns than greens to prevent odours and pests. |
| Moisture management | Keep the pile as damp as a wrung-out sponge; too wet or too dry stalls decomposition. |
| Regular turning | Turn the pile every one to two weeks to aerate and speed breakdown to two to four months. |
| What to avoid | Never add meat, dairy, fats, pet waste, or diseased plants to prevent pests and contamination. |
| Indoor option | Red wiggler worm bins work in small flats and produce concentrated fertiliser for potted plants. |
What composting has taught me about keeping things simple
People overthink composting. I did too, at first. I spent weeks reading about carbon-to-nitrogen ratios and pile temperatures before I had added a single apple core to a bin. The truth is that the system is forgiving. Microbes and worms do the actual work. Your job is to not get in their way.
The single habit that made the biggest difference for me was keeping a small caddy on the kitchen bench and a bag of shredded cardboard in the garden shed. Every time I added scraps, I added a handful of cardboard. That one routine eliminated every smell and pest problem I had previously experienced. It also meant I stopped dreading the trip to the bin because there was nothing unpleasant waiting for me.
The mistake I see most often in beginners is adding greens without browns, usually because dry materials feel less urgent to collect. Store a bag of dry autumn leaves in autumn and you will have browns available all year. It sounds almost too simple, and that is exactly the point.
I have also found that reducing food waste and composting work best as a pair. When you know that every scrap has somewhere useful to go, you become more deliberate about what you buy and what you use. The garden benefits are real too. Beds fed with homemade compost hold moisture better, need less watering, and produce noticeably healthier plants. That feedback loop, from kitchen to bin to garden, is what keeps the habit going.
— Arjit
Support your eco-friendly lifestyle with Naturessoulshop

Composting is one part of a broader commitment to living with less waste and more intention. Naturessoulshop stocks a curated range of organic and natural products designed to complement exactly that kind of lifestyle. From kitchen caddies and natural garden care supplies to organic fruit and vegetables, dry grocery staples, and eco-friendly home care products, everything is chosen with clean ingredients and sustainability in mind. If you are building a home that produces less waste and puts more back into the earth, the Naturessoulshop online store is a practical place to start. Browse the full range and find products that fit naturally into your composting routine and beyond.
FAQ
What is the easiest way to start composting at home?
Start with a stationary bin placed in a semi-shaded spot, layer kitchen scraps between dry leaves or shredded cardboard at a ratio of one part greens to two or three parts browns, and keep the pile as moist as a wrung-out sponge. Heat generated by microbes can be felt within one to two days of setting up the pile.
How long does home compost take to be ready?
Actively managed compost takes two to four months when turned regularly. A passive pile that is left undisturbed takes six to twelve months. Finished compost looks dark, crumbly, and smells like fresh earth.
Can I compost in a flat without a garden?
Yes. A worm bin using red wigglers (Eisenia fetida) fits on a balcony or under a kitchen sink and processes food scraps efficiently without outdoor space. The resulting worm castings are an excellent fertiliser for houseplants and window boxes.
Why does my compost smell bad?
Bad odours signal imbalance, typically too many greens, not enough browns, or excessive moisture. Add a generous layer of dry leaves or shredded cardboard, turn the pile to introduce air, and the smell should resolve within a few days.
What should I never put in my compost bin?
Avoid meat, fish, dairy, cooked food, fats and oils, pet waste, diseased plants, and any synthetic materials. These items attract rodents, introduce pathogens, and do not break down cleanly in a standard home compost system.


