
TL;DR:
- Home composting transforms organic waste into nutrient-rich soil by balancing greens and browns, which can be managed with simple materials and understanding. Proper bin placement, moisture control, and regular turning are essential, while avoiding materials like meat or dairy prevents pests and odours. Cold composting and vermicomposting are beginner-friendly methods that require minimal management and produce rich soil amendments over time.
Home composting is the managed decomposition of organic kitchen and garden waste into a nutrient-rich soil amendment that any beginner can produce at home. The US EPA defines the two core material categories as greens (nitrogen-rich kitchen scraps) and browns (carbon-rich dry matter such as leaves and cardboard). Done correctly, composting diverts organic waste from landfill, improves soil structure, and reduces the need for synthetic fertilisers. You need no specialist knowledge to start. A compost bin, a garden fork, and a basic understanding of what to add are all that stand between you and a working pile.
What materials can you compost at home?
The foundation of successful home composting for beginners is understanding what goes in and what stays out. The EPA advises chopping larger pieces before adding them, which dramatically speeds up microbial breakdown by increasing surface area. Getting the balance of greens and browns right is the single most important skill to develop early.
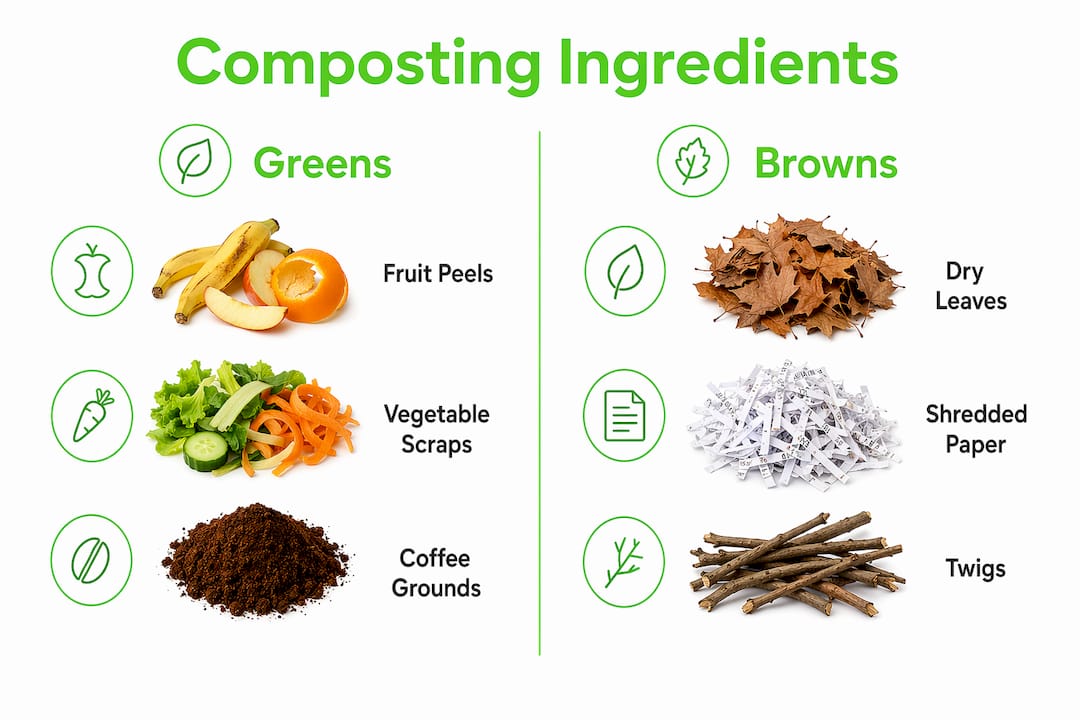
Greens: your nitrogen source
Greens are wet, nitrogen-rich materials that feed the microorganisms driving decomposition. Suitable greens include fruit and vegetable peelings, coffee grounds, tea bags (without staples), fresh grass clippings, and plant trimmings. These materials break down quickly and generate heat inside the pile. You can find practical guidance on identifying the best kitchen scraps for composting to make the most of what your kitchen produces each week.
Browns: your carbon source
Browns are dry, carbon-rich materials that provide structure and prevent the pile from becoming a soggy, smelly mess. Good browns include dry leaves, cardboard torn into small pieces, paper bags, straw, and small woody twigs. The recommended mixing ratio is 2 to 3 parts browns to 1 part greens by volume. This ratio maintains the carbon-to-nitrogen balance that microorganisms need. Balancing carbon-to-nitrogen ratio is critical because too much nitrogen causes ammonia odours, while too much carbon slows the whole process down.
What to keep out entirely
Certain materials cause serious problems and must never enter your compost pile:
- Meat, fish, and bones: attract rodents and produce foul odours
- Dairy products and eggs: same pest and odour risks as meat
- Cooking oils and greasy food: coat materials and block airflow
- Pet waste: contains pathogens harmful to humans
- Diseased plants: can spread disease back into your garden
- Treated or painted wood: contains chemicals toxic to soil life
The EPA is clear that failing to cover food scraps with 4 to 8 inches of browns is one of the most common beginner errors. It attracts animals and generates the kind of odour that puts people off composting entirely.
How to set up a compost bin: location and type
Choosing the right bin and placing it correctly determines whether your composting experience is pleasant or frustrating. The Queensland DETSI guidance confirms that shade placement retains moisture and supports microbial activity better than full sun in most climates. A spot that dries out completely in summer will stall decomposition for months.

The table below compares the most common bin types to help you choose the right one for your space and lifestyle.
| Bin type | Best for | Key advantage | Key limitation |
|---|---|---|---|
| Open pile | Large gardens with space | No cost, easy to turn | Exposed to pests and weather |
| Wire or wood bin | Medium gardens | Good airflow, low cost | Slower in cold weather |
| Tumbler bin | Smaller gardens | Fast decomposition, pest-resistant | Higher upfront cost |
| Worm bin (vermicomposting) | Flats, small kitchens | Works indoors, very rich output | Requires worm management |
Site your bin on bare soil or grass rather than concrete, so excess moisture drains away and worms can migrate in naturally. Keep it at least a metre from fences and house walls to allow airflow on all sides. A well-drained, semi-shaded position is the practical ideal for most UK and Australian gardens.
Pro Tip: If your only available spot is in full sun, add an extra layer of browns each time you add greens. This compensates for faster moisture evaporation and keeps the pile from drying out between turnings.
For anyone without outdoor space, a worm bin set up under the kitchen sink or on a balcony is a genuine alternative. The setup requires a ventilated container, damp bedding material such as shredded newspaper, and red wiggler worms. It produces some of the richest compost available from any method.
Step-by-step guide to managing your compost pile
Once your bin is in place, consistent management is what separates a pile that produces finished compost in three months from one that sits unchanged for two years. Follow these steps to keep decomposition active from day one.
- Lay a base of browns. Start with a 4 to 6 inch layer of bulky brown material such as straw or wood chips. This absorbs excess liquid from the greens you add on top and keeps the base aerated.
- Layer greens and browns. Add materials in alternating layers, like a lasagne. Each time you add kitchen scraps, cover them immediately with a layer of browns at least twice as deep.
- Check moisture regularly. Maintain moisture at 40 to 60%, which feels like a wrung-out sponge. Squeeze a handful of compost. If no water drips out and it holds its shape loosely, the moisture is correct.
- Turn the pile every 1 to 3 weeks. Use a garden fork or a compost aerator to mix the outer cooler material into the warm centre. Turning every 1 to 3 weeks reduces odours and speeds decomposition significantly.
- Monitor temperature. A well-managed hot pile reaches 131 to 160°F (55 to 71°C) in the thermophilic range. This temperature range kills weed seeds and pathogens. If you push your hand 15 centimetres into the pile and it feels warm, the process is working.
- Adjust as needed. If the pile smells bad, add browns and turn it. If it is not heating up, add greens or a nitrogen booster such as fresh grass clippings.
- Wait for finished compost. Hot composting takes 3 to 6 months while cold composting takes a year or more. Finished compost is dark, crumbly, and smells like forest soil.
Pro Tip: Keep a small covered bucket on your kitchen counter for collecting daily scraps. Empty it into the compost bin every two to three days. This prevents odours indoors and keeps your greens fresh rather than slimy.
Common composting mistakes and how to fix them
Most composting problems have straightforward solutions once you know what to look for. The key is reading the symptoms your pile gives you.
- Bad smell (ammonia or rotten egg odour): Too much nitrogen or insufficient airflow. Add a generous layer of browns and turn the pile immediately. Symptom-based troubleshooting confirms that bad odour almost always means the pile needs turning rather than new ingredients.
- No heat after two weeks: The pile lacks nitrogen or is too small to retain heat. Add fresh grass clippings or vegetable scraps and check that the pile is at least one cubic metre in volume.
- Pile is too dry: Sprinkle water over the pile as you turn it, adding small amounts until the sponge test passes. Dry piles decompose extremely slowly.
- Pests or animals investigating: You have likely added meat, dairy, or uncovered food scraps. Remove the offending material, cover all scraps with 4 to 8 inches of browns, and consider switching to a sealed tumbler bin.
- Pile is slimy and matted: Too many wet greens without enough structure. Add torn cardboard or dry leaves and turn thoroughly to break up compacted layers.
Patience is the most underrated composting skill. Cold composting with minimal management still produces finished compost. It simply takes longer. Do not abandon a pile because it looks unchanged after a month.
Reducing the amount of food that reaches your bin in the first place also helps. Practical steps for reducing food waste at home mean less material to manage and a more balanced pile overall.
Is vermicomposting a good option for small spaces?
Vermicomposting is the process of using red wiggler worms (Eisenia fetida) to convert food scraps into worm castings, one of the most nutrient-dense soil amendments available. It is the best easy composting method for anyone without outdoor space.
Setting up a worm bin requires:
- A plastic or wooden container with a lid, at least 30 centimetres deep
- Ventilation holes drilled in the sides and lid, covered with fine mesh to prevent escapes
- Damp bedding made from shredded newspaper or coconut coir
- A starter population of red wiggler worms (available from garden centres or online)
- Regular feeding with fruit and vegetable scraps, coffee grounds, and crushed eggshells
Vermicomposting indoors works best when the bin stays dark, the bedding remains slightly wetter than a moist sponge, and food is buried under the bedding rather than left on top. Proper setup and feeding prevent the fruit flies and odours that put beginners off the method. Worm castings can be harvested every two to three months and used directly as a planting mix or diluted in water as a liquid feed.
Key takeaways
Successful home composting requires the right material balance, consistent moisture, regular aeration, and patience to see results across weeks or months.
| Point | Details |
|---|---|
| Use the right ratio | Mix 2 to 3 parts browns with 1 part greens by volume to balance carbon and nitrogen. |
| Choose the right bin | Match your bin type to your space: tumblers for small gardens, worm bins for indoors. |
| Maintain moisture and air | Keep the pile as damp as a wrung-out sponge and turn it every 1 to 3 weeks. |
| Troubleshoot by symptoms | Bad odour means turn and add browns; no heat means add greens or increase pile size. |
| Expect realistic timelines | Hot composting finishes in 3 to 6 months; cold composting takes a year or more. |
What I have learnt from years of watching beginners compost
Most people who give up on composting do so in the first six weeks, usually because they expected a tidy, odourless process and got something messier than anticipated. My honest observation is that the advice most beginners receive is too focused on perfection and not enough on recovery.
The wrung-out sponge moisture test is the single most useful thing I have ever passed on to a new composter. It takes five seconds, requires no equipment, and tells you everything you need to know about whether your pile is on track. No moisture meter required. No thermometer needed in the early stages. Just squeeze a handful and trust what you feel.
I also think the obsession with hot composting puts beginners off unnecessarily. Cold composting, where you simply add materials and wait, still works. It takes longer, yes. But it requires almost no management and produces the same finished product. If you are new to this, start cold. Get comfortable with the rhythm of adding materials and checking moisture. Switch to active hot composting once you understand what a healthy pile looks and smells like.
The other thing I would say is this: your local cooperative extension service or gardening community is an underused resource. In the UK, the Royal Horticultural Society publishes free composting guidance. In the US, university extension programmes from institutions like NC State Extension and UGA CAES offer free advice tailored to your local climate. Use them. Composting is not complicated, but local conditions matter more than most generic guides admit.
— Arjit
Start your sustainable journey with Naturessoulshop
Composting is one part of a broader commitment to living more sustainably, and what you grow your food in matters as much as what you eat. Naturessoulshop supports that whole picture. From organic fresh produce grown without synthetic inputs to natural home care and skin care products with clean ingredients, everything at Naturessoulshop is chosen to complement a low-waste, health-conscious lifestyle.

If you are building a composting habit alongside a cleaner approach to eating and living, the Naturessoulshop online store is a practical next step. Browse organic fruits, vegetables, dry grocery, dairy, and vegan and gluten-free options that align with the same values driving your composting practice.
FAQ
What is the easiest composting method for beginners?
Cold composting is the simplest method. You add organic materials to a bin or pile over time and allow them to decompose naturally without active management, producing finished compost in approximately one year.
What kitchen scraps can I compost at home?
Fruit and vegetable peelings, coffee grounds, tea bags, and crushed eggshells are all suitable. Avoid meat, dairy, oily foods, and cooked leftovers, as these attract pests and cause odours.
How often should I turn my compost pile?
Turn your pile every 1 to 3 weeks to introduce oxygen and speed decomposition. More frequent turning produces finished compost faster, particularly in a hot pile.
How do I know when my compost is ready to use?
Finished compost is dark brown, crumbly, and smells like earthy forest soil. Hot composting finishes in 3 to 6 months; cold composting takes a year or more depending on conditions.
Can I compost indoors without a garden?
Yes. Vermicomposting using red wiggler worms in a ventilated container works well in kitchens, under sinks, or on balconies. Indoor vermicomposting produces nutrient-rich worm castings without requiring any outdoor space.


